Overview
Microsoft Outlook 365 is a popular email and calendar service that is increasingly being adopted by colleges and universities throughout the country. It is well integrated with the Microsoft 365 suite of products and offers enhanced security and privacy features.
To access your Outlook 365 email, you have several options you can use:
- Outlook on the web available through the TUportal or TUmail website
- Outlook app on your Windows or Mac computer
- Outlook app on your iPhone or Android phone
Using Outlook on the web (TUmail)
Setting Up the Outlook Mobile App
To access mail on your phone, you can use the Outlook mobile app:
Outlook App for Apple iOS Setup
Page 2 of 4
Open the app. Then enter your AccessNet -username @temple.edu (for example, tua00000@temple.edu) and tap Add Account .

Page 3 of 4
Enter your AccessNet password. Then tap Sign In .

Page 4 of 4
When prompted to add another account, tap Maybe Later . Your Inbox will then appear.

Outlook App for Android Setup
Page 2 of 5
Open the app. Then tap Get Started .

Page 3 of 5
Enter your AccessNet -username @temple.edu (for example, tua00000@temple.edu ). Then tap Continue .

Page 4 of 5
Enter your AccessNet password. Then tap Sign In.

Page 5 of 5
When prompted to add another account, tap Skip . Your Inbox will then appear.

Setting Up Other Mail Apps
While Outlook on the web and the Outlook app are the recommended methods for accessing Outlook 365 on your computer or phone, you can alternatively set up Apple Mail on a Mac or the default mail apps for your phone:
Apple Mail App Setup (macOS)
Page 1 of 8
Note: These instructions are for macOS Mojave or higher
In the upper left hand corner of your Mac select the Apple icon and then System Preferences .

Page 2 of 8
Select Internet Accounts .

Page 3 of 8
Select Exchange.

Page 4 of 8
Enter your name and your AccessNet -username @temple.edu (for example, tua00000@temple.edu ). Then click Sign In .

Page 5 of 8
Click Sign In again.

Page 6 of 8
At the Temple login screen, enter your AccessNet username (for example, tua00000 ) and password. Then click Sign In or Login .
![]()
Page 7 of 8
On the Permissions requested screen, click Accept .

Page 8 of 8
Make sure Mail is selected and click Done .

Apple iOS (Default Mail App) Setup
Page 1 of 9
Note: These instructions are written for iOS 14.4. On the home screen of your device, tap Settings .

Page 2 of 9
Tap Mail .

Page 3 of 9
Tap Accounts .

Page 4 of 9
Tap Add Account .

Page 5 of 9
Tap Microsoft Exchange .

Page 6 of 9
Type your AccessNet -username @temple.edu email address. Then tap Next .

Page 7 of 9
Tap Sign In .
![]()
Page 8 of 9
If prompted to select an account, tap Work or school account .

Page 9 of 9
Enter your AccessNet username and password. Then click Login .

Android (Default Mail App) Setup
Note: You may see slight differences depending on your version of the Android OS.
- Go to Settings .

- Go to Accounts > Add account . Then select Exchange .
- Enter your AccessNet -username (for example, tua00000) and select Next .
- Enter your AccessNet password and select Sign In .
- When prompted to grant permission, tap Accept .
- When notified that Setup is complete, select Done .
You have successfully added your Outlook 365 email account on your Android device. Depending on how much data is in the mailbox, it might take some time before your information is completely downloaded into your device.
Learning to Use Outlook 365
General Resources
Microsoft Innovative Educator Cohort Training Recordings
Microsoft and NCCE have created a free, recorded training series specifically for Temple. This training series features three different sessions that cover how Outlook, OneDrive and Teams work seamlessly together for productivity and collaboration and how they can integrate with specific Temple systems, such as Canvas and Zoom. To get started, see the links below:
Outlook on the web
Below are a few tips to consider when using Outlook on the web:
- Conversation View
Conversation View is turned on by default. If you are having trouble finding your messages, turn Conversation View off by clicking the Settings icon  at the top of the page. Then scroll down and under Conversation view , select Off .
- Reading Pane
The default setting of your screen display has the reading pane on the right. To have the reading pane appear at the bottom, click the Settings icon  at the top of the page. Then scroll down and under Reading pane , select Show on the bottom .
- New Window Icon
You can create a mail message in a new window by clicking the open in new window icon  on the upper right portion of the compose message screen.
- Searching
If you are having trouble finding a particular message, consider using an Advanced Search Query to refine your search results. For example, to search for the word "holiday" in the Subject of a message, enter subject: holiday in the search box. To learn more, see Search Mail and People in Outlook on the web .
Additional useful links for Outlook on the web:
Outlook app for Windows or Mac
Outlook Mobile app
Encryption
Outlook 365 enables you to encrypt messages sent to other Temple Outlook 365 email accounts or to accounts outside of Temple. If you are sending a message containing HIPAA Protected Health Information (PHI), Personally Identifiable Information (PII) or other confidential/sensitive information , make sure to encrypt it as shown below.
Note: The encryption feature is not currently available to alumni.
Sending an Encrypted Message
Page 1 of 1
Begin typing your message. On the Options tab, click the lock icon and choose one of the following:
► Encrypt
Least Restrictive: The recipient can view your message and perform all functionality.
► Encrypt-No Forward
More Restrictive: The recipient can view your message or include your message in a reply or reply all. The recipient cannot forward, copy or print your message.

Page 1 of 1
Begin typing your message. On the Message tab, click Sensitivity , Encryption and one of the following:
► Encrypt-Only
Least Restrictive: The recipient can view your message and perform all functionality.
► Encrypt-No Forward
Medium Restrictive: The recipient can view your message or include your message in a reply or reply all. The recipient cannot forward, copy or print your message.
► Encrypt-View Only
Most Restrictive: The recipient can view your message only.

Page 1 of 4
Begin typing your message. Then at the bottom of the screen, tap the three dots:

Page 2 of 4
Tap Add Sensitivity .

Page 3 of 4
Finally, tap one of the following:
► Encrypt-Only
Least Restrictive: The recipient can view your message and perform all functionality.
► Encrypt-No Forward
Medium Restrictive: The recipient can view your message or include your message in a reply or reply all. The recipient cannot forward, copy or print your message.
► Encrypt-View Only
Most Restrictive: The recipient can view your message only.

Page 4 of 4
A small lock icon will then appear next to the subject indicating it will be encrypted when you send the message.

Receiving an Encrypted Message
Page 1 of 1
If you receive an encrypted email from another Outlook 365 user at Temple, it will open normally but will contain one of the following messages at the top, indicating the actions you can perform:
Encryption\Encrypt-Only
You can view the email message and perform any function.
Encryption\Encrypt-No Forward
You can view the email message or include it in a reply or reply all. You cannot forward, copy or print the message.
Encryption\Encrypt-View Only
You can view the email message only.
![]()
Page 1 of 1
The mail message will then appear with a blue lock icon at the top right indicating it is encrypted. If you tap this icon, you can see what action(s) you can perform:
Encryption\Encrypt-Only
You can view the email message and perform any function.
Encryption - Encrypt-No Forward
You can view the email message or include it in a reply or reply all. You cannot forward, copy or print the message.
Encryption - Encrypt-View Only
You can view the email message only.
Page 1 of 3
If you send a message to someone outside of Temple, the recipient will first be prompted to read the message.
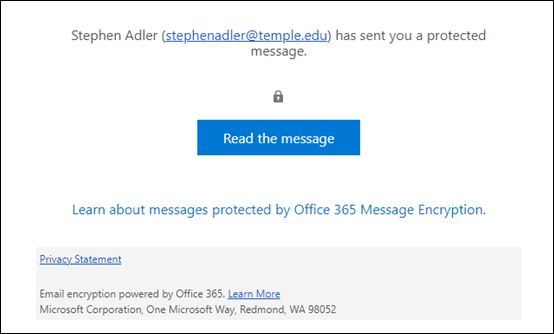
![]()
Page 2 of 3
They will next be prompted sign in with Google or with a One-time passcode (which will be emailed to them). Once they sign in, the message will then appear:

Page 3 of 3
The mail message will then appear with a message at the top, indicating it is encrypted along with the action(s) you can perform:
► Encryption - Encrypt-Only
You can view the email message and perform any function.
► Encryption - Encrypt-No Forward: Encryption View content, Reply, Reply all and no forwarding, no printing.
You can view the email message or include it in a reply or reply all. You cannot forward, copy or print the message.
► Encryption - Encrypt-View Only: This will encrypt and only allow viewing.
You can view the email message only.
![]()
Creating a Vacation Message
Reporting Phishing
If you receive a suspicious email and would like to report it, you can easily do so forwarding the message to abuse@temple.edu .
Governance
Microsoft Outlook has the following data retention schedule:
- Inbox & Personal Folders: Messages are retained indefinitely (although this will likely change).
- Deleted Items & Junk Mail Folders: Messages are retained for 30 days.
- Recoverable Items Folder: Messages are retained for 14 days after being removed from the Deleted Items folder. For more information, see Recover and restore deleted items in Outlook .
- Archive Mailbox (faculty/staff only): If enabled, messages older than two years are automatically archived to this mailbox and then stored indefinitely. To request an Archive Mailbox, contact the Technical Support Center as desribed below.
Support
Please contact the Technology Support Center at tuhelp.temple.edu (click Chat or Request Help) or call 215-204-8000.